The Perfect Patch
April 07, 2017
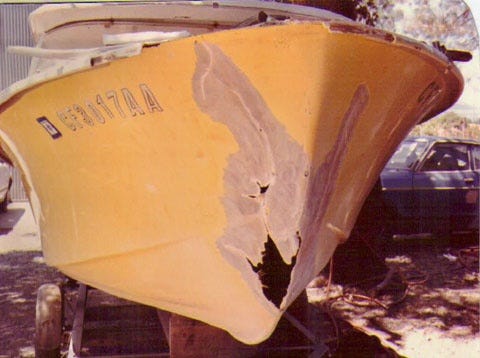
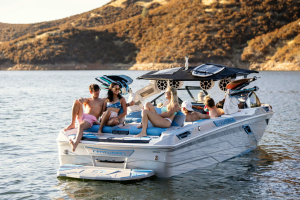
Hole in the boat? No fear – repairing damaged fiberglass is easier than you might think. With time, patience, and the right tools and materials, you can make simple repairs to your fiberglass hull.
Supplies. Besides fiberglass fabric, resin, and gel coat, you'll need a disc sander or grinding wheel, scissors,sandpaper in coarse and fine grits, a couple of paint brushes, acetone, rags, cardboard, a roll of plastic wrap, and masking tape. You'll also need a well-ventilated place to work, safety goggles, a dust mask, and gloves.
Check the weather. Pick a warm, not-muggy day to make your repair. Resin cures best at temperatures above 65F (18C) and in moderate humidity.
Protect yourself. As anyone who's ever worked with it can tell you, fiberglass is itchy and irritating. When you're patching your fiberglass boat, wear long sleeves, goggles, a dust mask, and gloves.
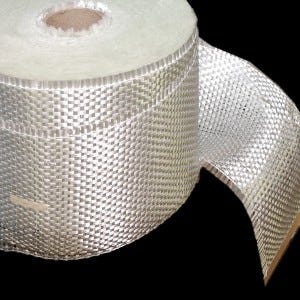
Fiberglass. If you're not using a repair kit, choose the right type of fiberglass fabric. Roving is heavier and is used for inner layers. You can use lighter fiberglass fabric for the outermost layer, and Great Lakes Skipper has both types of fiberglass, available by the yard or by the roll.
 Round off. Cut a circle or oval around the damaged fiberglass. Don't try to work with raggedy fiberglass: cut it out and start fresh. Rounding the hole removes corners, which can be weak points.
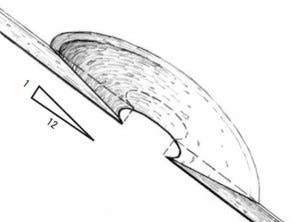
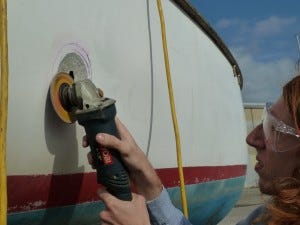 Bevel it back. Use a disc sander or grinding wheel to bevel the hole's edge to a 12-to-1 ratio. This helps create a strong bond with the new glass and resin. Wipe away dust with acetone and a soft cloth. Caution: Acetone is flammable. Don't smoke while you're using it and dispose of acetone-soaked cloths properly.
 Make a mold. Some boaters make a backing piece from plastic, but you can use cardboard covered with plastic wrap. Cut the cardboard (or plastic) about 2 inches larger than the hole, all around. Cover it with plastic wrap, avoiding wrinkles, and tape it down. On the inside of the hull, carefully fit the cardboard to the hull and securely tape it into position. This will act as a mold for your fiberglass repair.
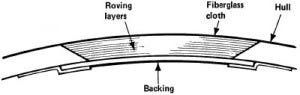
Inside out. You're going to fill the hole from the inside out, using progressively larger pieces to cover all that beveling you did earlier. Cut the first layer to match the hole's diameter and place it in the hole. Cut each layer a little larger than the one before and lay each in place until the hole is filled. Cut the last, largest layer from your lightweight fiberglass. Remove the pieces and set them on a clean surface, keeping them in order.
Make a mold. Some boaters make a backing piece from plastic, but you can use cardboard covered with plastic wrap. Cut the cardboard (or plastic) about 2 inches larger than the hole, all around. Cover it with plastic wrap, avoiding wrinkles, and tape it down. On the inside of the hull, carefully fit the cardboard to the hull and securely tape it into position. This will act as a mold for your fiberglass repair.
Inside out. You're going to fill the hole from the inside out, using progressively larger pieces to cover all that beveling you did earlier. Cut the first layer to match the hole's diameter and place it in the hole. Cut each layer a little larger than the one before and lay each in place until the hole is filled. Cut the last, largest layer from your lightweight fiberglass. Remove the pieces and set them on a clean surface, keeping them in order.
 Mix it up. Mix your resin according to the package instructions. Polyester resin is fine for repairs above the waterline. For patches that will spend most of the time submerged, choose epoxy. Remember, this stuff is meant to harden quickly, so work quickly, but carefully.
Smallest to largest. Set the smallest piece of roving cloth on a clean sheet of cardboard or posterboard. Use a paintbrush to apply the resin to the fabric, allowing it to soak in until the roving is saturated, but not dripping wet. Using gloves, take the piece and lay it into the hole, pressing it in carefully and using the brush to smooth it from the center to the edges.
Resin, repeat. Repeat with each layer, small to large, until the hole is filled. To apply the outermost layer, lay the fiberglass cloth in place on the hull and apply resin to it with your brush. Be careful not to use too much resin.
Now we wait. Leave the patch to cure for the time specified on the resin label, or at least 8 hours. Once everything has cured, peel off the tape and remove the cardboard backing from inside the hull. Carefully sand the patch until it matches the hull's contour. Finish by dry- or wet-sanding by hand with 100, 200, and 300 grit paper. You can use finer grits and polishing compounds for an ultra-smooth finish, too. Wipe the sanded area with acetone.
You're almost done! Mix your gel coat according to the manufacturer's directions and use a brush to apply a thin, even coat to the entire patch. Cover the patch smoothly with plastic wrap, pressing out wrinkles and bubbles. Let the gel coat cure for at least 8 hours, or as directed by the manufacturer. Peel off the plastic and wet-sand carefully by hand with extra-fine sandpaper.
Final polish. Once you've sanded out any bumps, waves, or scratches, clean the patch with a wet cloth, buff it with fiberglass buffing compound, and apply a coat of wax.
Mix it up. Mix your resin according to the package instructions. Polyester resin is fine for repairs above the waterline. For patches that will spend most of the time submerged, choose epoxy. Remember, this stuff is meant to harden quickly, so work quickly, but carefully.
Smallest to largest. Set the smallest piece of roving cloth on a clean sheet of cardboard or posterboard. Use a paintbrush to apply the resin to the fabric, allowing it to soak in until the roving is saturated, but not dripping wet. Using gloves, take the piece and lay it into the hole, pressing it in carefully and using the brush to smooth it from the center to the edges.
Resin, repeat. Repeat with each layer, small to large, until the hole is filled. To apply the outermost layer, lay the fiberglass cloth in place on the hull and apply resin to it with your brush. Be careful not to use too much resin.
Now we wait. Leave the patch to cure for the time specified on the resin label, or at least 8 hours. Once everything has cured, peel off the tape and remove the cardboard backing from inside the hull. Carefully sand the patch until it matches the hull's contour. Finish by dry- or wet-sanding by hand with 100, 200, and 300 grit paper. You can use finer grits and polishing compounds for an ultra-smooth finish, too. Wipe the sanded area with acetone.
You're almost done! Mix your gel coat according to the manufacturer's directions and use a brush to apply a thin, even coat to the entire patch. Cover the patch smoothly with plastic wrap, pressing out wrinkles and bubbles. Let the gel coat cure for at least 8 hours, or as directed by the manufacturer. Peel off the plastic and wet-sand carefully by hand with extra-fine sandpaper.
Final polish. Once you've sanded out any bumps, waves, or scratches, clean the patch with a wet cloth, buff it with fiberglass buffing compound, and apply a coat of wax.
Round off. Cut a circle or oval around the damaged fiberglass. Don't try to work with raggedy fiberglass: cut it out and start fresh. Rounding the hole removes corners, which can be weak points.
Bevel it back. Use a disc sander or grinding wheel to bevel the hole's edge to a 12-to-1 ratio. This helps create a strong bond with the new glass and resin. Wipe away dust with acetone and a soft cloth. Caution: Acetone is flammable. Don't smoke while you're using it and dispose of acetone-soaked cloths properly.
Make a mold. Some boaters make a backing piece from plastic, but you can use cardboard covered with plastic wrap. Cut the cardboard (or plastic) about 2 inches larger than the hole, all around. Cover it with plastic wrap, avoiding wrinkles, and tape it down. On the inside of the hull, carefully fit the cardboard to the hull and securely tape it into position. This will act as a mold for your fiberglass repair.
Inside out. You're going to fill the hole from the inside out, using progressively larger pieces to cover all that beveling you did earlier. Cut the first layer to match the hole's diameter and place it in the hole. Cut each layer a little larger than the one before and lay each in place until the hole is filled. Cut the last, largest layer from your lightweight fiberglass. Remove the pieces and set them on a clean surface, keeping them in order.
Mix it up. Mix your resin according to the package instructions. Polyester resin is fine for repairs above the waterline. For patches that will spend most of the time submerged, choose epoxy. Remember, this stuff is meant to harden quickly, so work quickly, but carefully.
Smallest to largest. Set the smallest piece of roving cloth on a clean sheet of cardboard or posterboard. Use a paintbrush to apply the resin to the fabric, allowing it to soak in until the roving is saturated, but not dripping wet. Using gloves, take the piece and lay it into the hole, pressing it in carefully and using the brush to smooth it from the center to the edges.
Resin, repeat. Repeat with each layer, small to large, until the hole is filled. To apply the outermost layer, lay the fiberglass cloth in place on the hull and apply resin to it with your brush. Be careful not to use too much resin.
Now we wait. Leave the patch to cure for the time specified on the resin label, or at least 8 hours. Once everything has cured, peel off the tape and remove the cardboard backing from inside the hull. Carefully sand the patch until it matches the hull's contour. Finish by dry- or wet-sanding by hand with 100, 200, and 300 grit paper. You can use finer grits and polishing compounds for an ultra-smooth finish, too. Wipe the sanded area with acetone.
You're almost done! Mix your gel coat according to the manufacturer's directions and use a brush to apply a thin, even coat to the entire patch. Cover the patch smoothly with plastic wrap, pressing out wrinkles and bubbles. Let the gel coat cure for at least 8 hours, or as directed by the manufacturer. Peel off the plastic and wet-sand carefully by hand with extra-fine sandpaper.
Final polish. Once you've sanded out any bumps, waves, or scratches, clean the patch with a wet cloth, buff it with fiberglass buffing compound, and apply a coat of wax.